
Pack right - how to make your hike easier
How you pack your backpack matters more than what equipment you have.
Pack it right and your pack will feel lighter, more stable and more natural to carry. Pack it wrong and you'll feel it right away - in your shoulders, in your steps and in the energy you lose along the way.
This guide shows you how to pack smarter by thinking in zones, keeping your weight close to your body and building a system that works in practice - not just on paper.
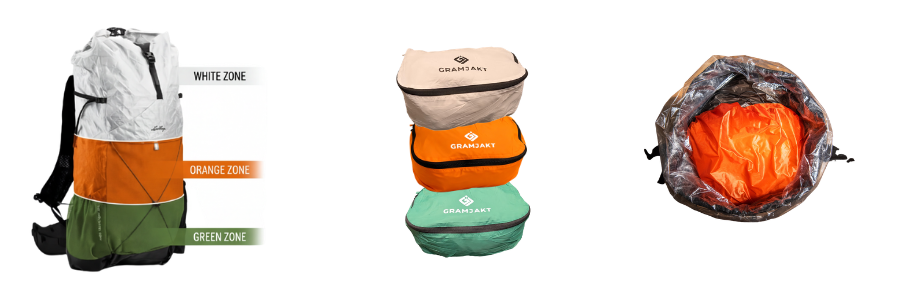
Top - what you use during the day (white zone)
At the top, put what you want to access quickly during the hike.
This is where rainwear, rain skirt, map, water filter, headlamp and snacks go. Also first aid, toilet paper, poop shovel, pee rag and small items such as lipstick.
At breaks, many people also put their reinforcement jacket here.
Everything at the top should be accessible without having to repack your entire backpack. This saves both time and energy during the day.
Some of this can also be in outer pockets for quick access, as long as it is protected from rain.
The upper part of the pack often also contains your food bag. This is where you keep everything - food, gas, kitchen, cutlery and small hygiene items. It makes it easy to stay organized and get started quickly in camp. Put it in Podd for easy handling.
Center - heavy and close to the body (orange zone)
In the middle, place what weighs the most.
Here you decide how the backpack will feel.
Heavy items should always be placed as close to your back as possible. If the weight is too far out, the backpack will pull backwards and feel heavier than it is.
Sleeping pads, tents and other heavier items belong here.
If you have a tent in a long, narrow bag, it may be worth repacking it. Put the canvas in a pod and place the poles on the outside of the backpack. This often gives better weight distribution, but is not a must.
If the tent is wet, I don't pack it in a pod. Then it ends up in the outer mesh pocket, or on the outside of the backpack. In some cases, the side pocket also works, if it fits. It keeps the rest of the pack dry and saves time in camp.
Water is often carried in side pockets for easy access, but with heavier loads it may be worth moving closer to your back for better balance.
Bottom - soft and malleable (green zone)
At the bottom of the backpack, place what is soft and not used during the day.
Sleeping bag and extra clothes are the base here. Many people choose not to use a separate bag for the sleeping bag, but let it fill out the bottom of the backpack. It provides a better fit and eliminates voids.
You can also store electronics such as a power bank and cables here, protected and stable. I usually put this above the soft, at the top of the green zone.
How to keep your pack dry
Protect the contents - not the outside.
Many people rely on rain covers, but in practice they are of limited use. Most of the backpacks we sell don't absorb much water, as they are made of technical, water-repellent materials. At the same time, they are rarely completely waterproof. Water can get in through seams, zippers and openings - especially during prolonged rain.
So the solution is simple:
Always pack waterproof inside your backpack.
Use a waterproof liner as a base. It can be something as simple as a plastic bag, but most people prefer a lightweight and durable nylon liner. These come in a variety of sizes, usually 40 or 70 liters, and fit the vast majority of backpacks. Buying tip: Gramjakt Nylon Pack Liner
Supplement with pack bags or pods to organize your gear. It makes it easier to stay organized, while giving you extra protection against moisture.
By packing right from the start, you avoid rain covers altogether. You'll save weight, reduce hassle and get a system that works better in the long run.
That's how we do it.
Buying advice - Packing pods
A simple multi-bag system that fits most backpacks.
Makes it easy to divide:
- Clothes
- Food items
- Small items
If you want to go even lighter, there are options in DCF. See the full range of packing bags here.
Small adjustments that make a big difference
- Pack in layers instead of stacking things vertically.
- Avoid hard objects directly against your back.
- Fill in gaps with soft garments.
- Test your pack and adjust as you go.
Many lightweight backpacks lack a frame. In this case, the sleeping pad can be used as a structure along the back or as a roll that gives stability to the bag. Tip: Skalmo Gramlite can be folded and used as a back support in frameless backpacks.
Conclusion
This is not about packing perfectly.
It's about finding a system that works for you.
But one thing is immediately apparent:
If you pack right, your backpack feels light.
Pack it wrong and you'll feel it all day.